Today, You will Learn how to set up your photo studio for Ghost Mannequin photography, the images you need to capture, and how to combine them in post-production.
If you work in the garment industry, you’ve probably struggled to show a product’s fit without going over budget or annoying your client.
Customers need to see how a product is shaped, and flat or folded displays need to offer more information. The items must be worn in your product photography, yet models are pricey, and mannequins can be off-putting.
The showcasing issue is resolved by the “ghost mannequin” effect, sometimes referred to as the “invisible mannequin,” “3D mannequin,” or “hollow man,” which is a quick and effective post-production method for clothes product photography.
In order to eliminate the model or mannequin in post-production processing, you can use the ghost mannequin Service to snap many images of a product while it is being shown on a model or mannequin.
The end result is a picture that is realistic and keeps the attention firmly on your goods.
A plan and Photoshop instructions are all that are required. We’ll demonstrate how.

Why Need Ghost Mannequin Photography
Although the principles are straightforward, effectively implementing them can be time-consuming and requires practice.
In this blog post, we will guide you through the entire process, from setting up your studio to creating the final product image.
By the end, you will have a comprehensive understanding of the invisible mannequin technique.
Resources and examples for photography
When creating an invisible mannequin image, multiple photos are combined to create a composite image.
The first photo is taken while the garment is on a model or mannequin, while the second and any additional photos are flat views of the garment’s interior that were previously blocked. These views are usually captured on a white foam board.
The majority of invisible mannequin photos are created with just two additional photographs, but occasionally more are required.
Everything relies on how your product is cut and shaped, as well as how much of the model or mannequin’s body is seen in the on-body shot photo.
Even while a mannequin is not necessary for some products, such as bracelets and watches, you still need to combine photographs to remove extraneous items and deal with challenging lighting.
Although the approach is somewhat similar, that kind of compositing isn’t truly an application of the ghost mannequin Photo editing Technique.
When producing invisible mannequin images for products, it is common to only use two images. Nevertheless, for products with distinctive shapes or cuts, it may be vital to include extra images.
The number of images required is determined by the amount of detail covered by the model or mannequin in the on-body shot image.
Planning your photography
In order to create the invisible mannequin effect, first photograph your product worn by a model or mannequin from the front and back.
When showcasing a product model, it’s important to choose a static pose to make editing easier. Keep the model’s appearance simple, and tie back long hair to avoid obstructing the product.
Opt for white mannequins as they are non-reflective and can blend into white backgrounds. For best results, use a static, lifelike mannequin and position arms and hands outside the frame to avoid distractions in the final image.
Make sure that your product fits your mannequin or model by using the right size or tailoring the garment to fit correctly.
If your product has sleeves, make sure to position the sleeves so that the viewer can’t see down them.
In order to execute the invisible mannequin technique, you need to be able to create high quality photographs in a studio setting.
The lower the quality of your photographs, the less appeal the invisible mannequin effect will be able to add to those images. Camera and lighting techniques, equipment, and placement all come into play here, depending on each particular product that you’re shooting.
When photographing tops, it’s important to position the camera to be directly level with the chest area, whereas the camera should be positioned across from the hip area to photograph bottoms.
Photographing a product from an angle that is either too high or too low may cause the garment to look tapered and inaccurate.
Below an example photograph of a tank top on a mannequin. The image was taken at chest-height, resulting in a flattering view of the product.
Using a telephoto zoom lens to capture your images can help to minimize distortion and provide you with the flexibility to move closer to smaller objects and move farther away from larger objects.
Make sure that your studio shooting space is large enough to accommodate your camera and tripod, two studio lights and umbrellas spaced evenly apart on either side of the product, and a backdrop.
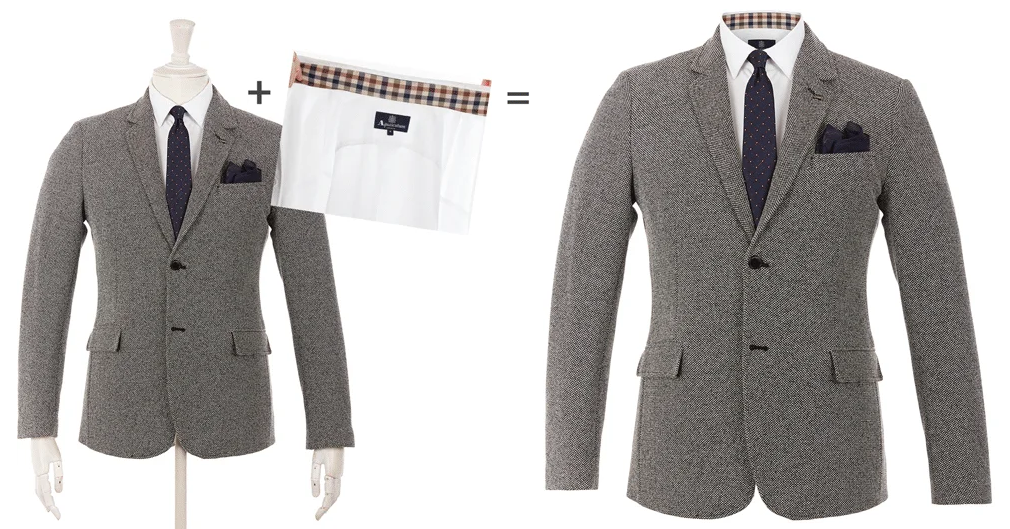
To create a 3D image with the invisible mannequin technique, you will first need to capture a front and back view of your product being worn by your mannequin or model.
After that, you should style and hang your product on a piece of white foam board and photograph both the front and back views again; these foam board shots will allow you to include the inner areas of the garment once you combine the images together, as shown below.
The necessary internal shots will be different for every product, and not all garments will require two internal shots.
Make sure to use the exact same lighting conditions for both the mannequin/model shots and the foam board shots. The easiest way to do this is to mark the mannequin’s/model’s location and make sure to place the foam board in exactly the same spot and at the same height.
When the mannequin and back images are combined together in post-production, the result is a 3D invisible mannequin effect that demonstrates shape and fit at a fraction of the cost of a model.
After you have captured the necessary views, it’s time for some Photoshop magic. You have two options for creating the invisible mannequin effect: do it yourself, or outsource to a professional product image editing service like Pixelz.
See our ghost mannequin service page or pricing page to learn more about how to get started and upload your image.
Option 1: DIY step-by-step Photoshop instructions
Creating the invisible mannequin effect is relatively simple, given that you own the proper post-production software (e.g. Adobe Photoshop) and that your products have been photographed correctly.
Outsourcing this work may save your company a great deal of time and frustration, but if you really want to make the edits yourself, follow these seven simple steps to create your own invisible mannequin effect in Photoshop (skip to the end for video):
Read More: Get Online Assignment Help To Enhance Your Style Of Learning
Step One: Open your files in Photoshop and create layers
First, you will need to open the mannequin image and the foam board image in Photoshop. Select your mannequin image and create a new background layer.
Fill that layer in with white; it will serve as your overall background when you’re finished. It’s also helpful to label your layers so that you can tell them apart and remain organized.
Step Two: Use a selection tool to select the product in the mannequin image. Now it’s time to select the product in your mannequin image.
Zoom in tight and choose your favorite selection tool: quick selection, lasso, or magic wand.
All three can help you to accomplish your desired selection.
Keep in mind that, in most cases, using a white background when shooting allows you to remove the mannequin easily because of the color separation between the product and the background.
Get started today
If you’re not already a Pixelz Professional subscriber and you’d like to add the Invisible Mannequin effect to your product images, get a 14 day free trial with 10 free image edits.
The business keyword “luxury car hire near me” is a valuable search term for individuals seeking high-end car rental services in their local area. It’s crucial for luxury car hire near me car rental companies to optimize their online presence for this keyword to attract potential customers looking to experience premium vehicles temporarily. This keyword combines the desire for opulence with convenience, making it a key driver for luxury car rental businesses. By ensuring their website is well-optimized for “luxury car hire near me,” companies can effectively reach a targeted audience interested in experiencing luxury and style without the commitment of ownership.